Creating an Icon Pack
This tutorial was written by slashie101.
As described in Requirements and Limits, icon packs for Dead by Daylight need to follow a couple of conditions to be recognised and function correctly in game. The NightLight icon pack uploader also has some checks for these as well as its own requirements. The main things to be aware of when creating and uploading a pack are:
- File Size: Each icon must be under 1MB.
- Pack Size: Packs are limited to 200MB total.
- File Resolution: The size of each icon depends on the specific type of icon usually (e.g. perks vs. portraits etc.) and some specific icons have a different resolution entirely.
- File Structure: DBD icons are organised in a specific folder structure, first by what kind of icon (e.g.
Perks,CharPortraits) and then into sub-folders. Sub-folders usually correspond to chapters and are named after some kind of keyword. There are however some icons that aren’t kept in folders or are otherwise in a place they wouldn't be expected to be. On top of that, while there are some naming conventions, there are just as many exceptions to each of these as well. The game and by extension NightLight, requires any custom icons to follow these exactly.
For more details on these, check out the Requirements and Limits documentation.
Downloading Default Icons
By far the easiest way to take into account all these requirements is to download a copy of the default icons from NightLight. The NightLight default icons minimal pack contains all the image files currently being used in the desktop version of the current patch of the game. It removes any redundant icons that are no longer in use or are from the mobile or console versions of the game. By downloading and looking at this pack, you will be able to see the existing file structures within the game across the customisable categories, including the code-worded folder and file names.
There are two ways of downloading these. Either download the .zip of the pack on the NightLight website or set a custom file path in the NightLight desktop app settings and “install” the default icons there.

If you plan to include any “unreleased” icons such as from a current PTB, don’t forget to check if these icons are included and find the relevant default pack if not. Just check the default icons tab in the app.

Uploading a Pack
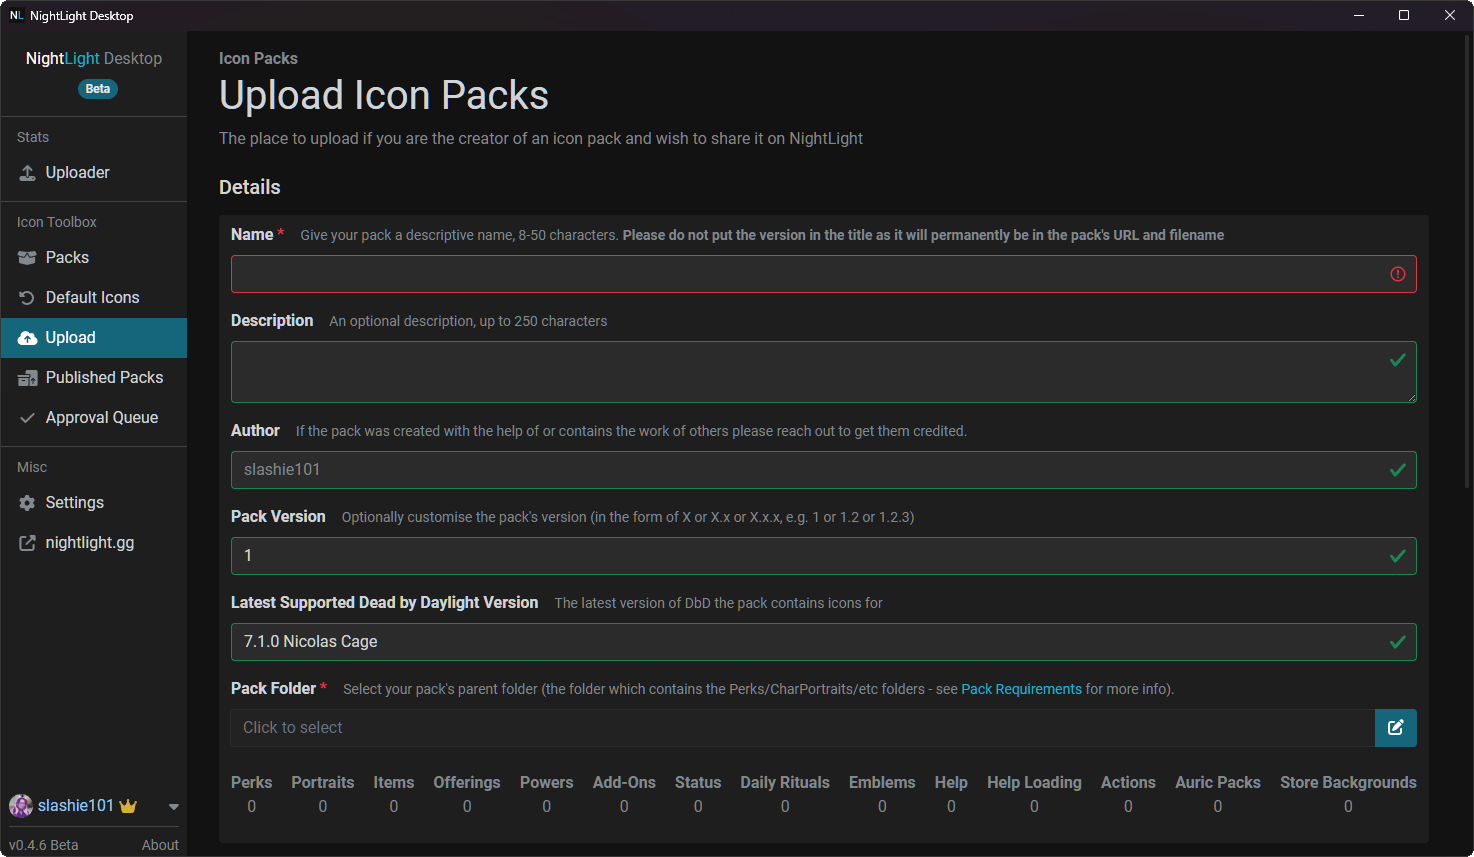
After downloading these icons, replace the icons you wish to upload to NightLight with your custom creations (more on how to make these below). Afterwards, delete any of the icons you didn't change (for example if it’s a perk-only pack, make sure to delete the other folders for portraits, offerings etc., as well as any perk icons you didn't change) before uploading the parent folder in the Upload tab on NightLight.
If you are receiving the “file path not recognised” error, the most common issue is that you are not uploading the correct folder. The folder being uploaded should contain the sub-folders, such as
Perks,CharPortraits,Favors- try going a folder higher if you are receiving this error. Otherwise, after checking your file names are correct by comparing to the default icons, ask for help in the Discord server.
The uploader will check which icons it has registered as being valid. Any errors will display what the issue is (e.g. if the file size is too large, if the resolution isn’t correct etc.) but if you require more support, join the Discord server to ask any questions.

Banner (optional)
When uploading an icon pack to NightLight there are two options to provide a quick preview for users. NightLight allows you to either pick four icons from the pack to display as a grid, or you can upload a custom banner. The custom banner should have a file resolution of 1200px x 300px. For some examples, check out some packs on NightLight with custom banners uploaded.

Creating Icons
Creating icons is as simple as making image files in the correct size and naming them such that the game can recognise them and load them up. There are many possible programs that can be used to create image files. Unfortunately this tutorial will not go into depth on how to use specific programs.
Before uploading it is highly recommended to test icons’ appearances in game by manually replacing the image files and then loading up the game.
Templates
For maximum convenience we have a set of templates available for creators to use freely. These templates were created by SubjectPs.
These Templates may vary in appearance depending on your screen resolution and in-game UI settings. They have been tested on 1920 x 1080 and 2560 x 1440 monitor resolutions.
The templates have all been made to reach the outer border of the in-game icons. This means they can be used to create a custom border or for borderless icons. The templates include:
- Perk templates (including token counters)
- Status Effect template
- Items / Add-ons / Powers templates
- Offering (Favor) templates
- Character Portrait template
For those just starting out with digital drawing and graphic editing, these files may not be easy to understand as they are just black, grey, or white. This simplifies the process of selecting the working canvas (where the drawing / image should be placed) within programs.
Perk Templates
The diamond shape is sized to fit the in-game icon perfectly. The area outside the diamond shape is considered the outer canvas.
The outer canvas area is still displayed in-game and is commonly used for glow effects and token counters, for example. However, when a perk is deactivated (e.g. Stake Out, Adrenaline) or has another overlay of some kind (e.g. the red timers), this overlay does not apply to the outer canvas. This can result in a strange display for icons that are larger than the initial diamond.

Extending too far into the outer canvas will also result in overlap between perk icons - for this reason it is not recommended. Transparency within the diamond will display the in-game perk tier (yellow, green, purple) as well as the default in-game black border.
Perk Template
![]()
The default template that goes to in game border (with straight edges) - use this to include a border or make borderless perk icons.
Perk Inner Template
![]()
This template extends to the edge of the in-game default black border. You can also layer this icon on top of Perks_Template or Vanilla_Perks_Template for smooth custom borders.
Vanilla Perk Template
![]()
This template does not have straight edges but is more accurate to the in-game perk icon edges.
Token Counters
![]()
![]()
These two token counters are included for perks such as Stake Out, Potential Energy etc. depending on the maximum number of tokens and can be overlaid on the other templates. Token counters do not need to use this exact shape; the template is intended to show the general location of how token counters should be placed.

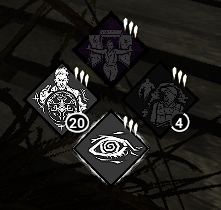
Perks with token counters (current as of 7.0.1):
Survivor Token Perk List
| Character | Folder Name | File Name | Perk Name | Token Count |
|---|---|---|---|---|
| General | iconPerks_smallGame | Small Game | 0 - 5 | |
| Élodie Rakoto | Aurora | iconPerks_appraisal | Appraisal | 3 - 0 |
| Yun-Jin Lee | Comet | iconPerks_FastTrack | Fast Track | 0 - 27 |
| Laurie Strode | DLC2 | iconPerks_soleSurvivor | Sole Survivor | 0 - 3 |
| Ace Visconti | DLC3 | iconPerks_upTheAnte | Up the Ante | 3 - 1 |
| Detective Tapp | Finland | iconPerks_stakeOut | Stake Out | 0 - 4 |
| Adam Francis | Haiti | iconPerks_autodidact | Autodidact | 0 - 5 |
| Jonah Vasquez | Ion | T_iconPerks_CorrectiveAction | Corrective Action | 0 - 5 |
| Jeffrey "Jeff" Johansen | Kenya | iconPerks_distortion | Distortion | 0 - 3 |
| Rebecca Chambers | Orion | iconPerks_Hyperfocus | Hyperfocus | 0 - 6 |
| Vittorio Toscano | Quantum | iconPerks_PotentialEnergy | Potential Energy | 0 - 20 |
| Gabriel Soma | Umbra | iconPerks_scavenger | Scavenger | 0 - 5 |
Killer Token Perk List
| Character | Folder Name | File Name | Perk Name | Token Count |
|---|---|---|---|---|
| The Twins | Aurora | iconPerks_coupDeGrace | Coup de Grâce | 0 - 10 |
| The Trickster | Comet | iconPerks_NoWayOut | No Way Out | 0 - 4 |
| The Shape | DLC2 | iconPerks_dyingLight | Dying Light | 0 - 11 |
| The Shape | DLC2 | iconPerks_playWithYourFood | Play With Your Food | 0 - 3 |
| The Shape | DLC2 | iconPerks_saveTheBestForLast | Save the Best for Last | 0 - 8 |
| General | DLC3 | iconPerks_thrillOfTheHunt | Hex: Thrill of the Hunt | 5 - 0 |
| The Hag | DLC3 | iconPerks_devourHope | Hex: Devour Hope | 0 - 5 |
| The Huntress | DLC5 | iconPerks_HuntressLullaby | Hex: Huntress Lullaby | 0 - 5 |
| The Nightmare | England | iconPerks_fireUp | Fire Up | 0 - 5 |
| The Nightmare | England | iconPerks_rememberMe | Remember Me | 0 - 4 |
| The Artist | Ion | T_iconPerks_grimEmbrace | Grim Embrace | 0 - 4 |
| The Artist | Ion | T_iconPerks_hexPentimento | Hex: Pentimento | 0 - 5 |
| The Artist | Ion | T_iconPerks_painResonance | Scourge Hook: Pain Resonance | 4 - 0 |
| The Ghost Face | Oman | iconPerks_furtiveChase | Furtive Chase | 0 - 4 |
| The Skull Merchant | Saturn | iconPerks_Leverage | Leverage | 0 - 10 |
Status Effect
![]()
By adding a darker border on the inner edge of the icon, the duration times of buffs and debuffs alike will have a greater visibility.
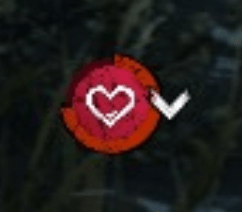
An unclear border can make it difficult to discern timers.
Items / Addons / Powers Template
![]()
This template works for all three. Some killer powers have a red or white gauge around the power icon at various times to represent charges, cool-down etc. For this reason, it is recommended to use a darker frame for visibility. The above template takes this into account by allowing for some of the black border from in-game to remain. The images below are templates for "borderless" icons as well as an inner area template (similar to the perk templates above).
![]()
![]()
Offering Template
Custom offering icons are only displayed in the load-out, blood-web, and end-game scoreboards; they are not displayed before loading into a match.
![]()
Character Portrait Template
![]()
Character portraits are a special case where the file size is larger than the area shown in game; the area displayed has also recently been changed. The portraits are displayed in two places in-game:
- The character selection screen
- The shop selection screen
The shop selection screen is slightly smaller but both are restricted by the in-game borders, which are also not straight lines. For this reason it is not recommended to include a border as part of your custom portrait icon, and any portraits should be tested on both selection screens.
Make sure to take the prestige emblem placement and the shop indicators for new and on sale items, as well as cosmetic counts, into consideration when designing portraits. Killswitches also apply a filter that is smaller than the portrait template - however, this is a rare case and likely won't have much impact on the end result. Here are some examples of the template area in-game:
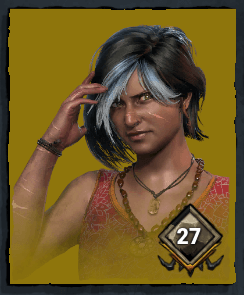
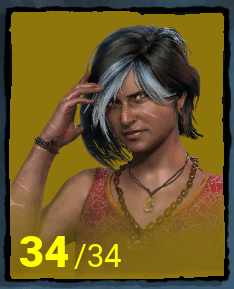
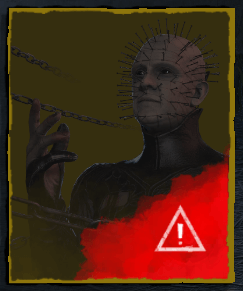
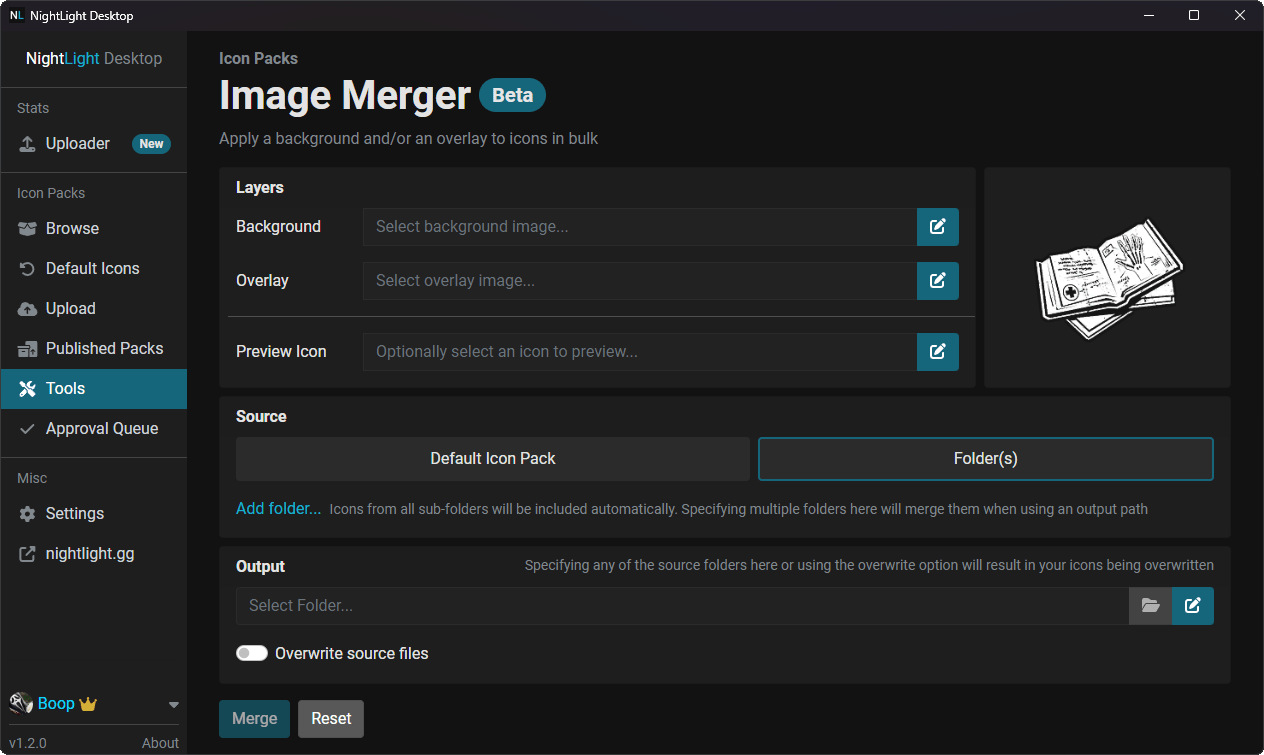
Image Merging Tool
To help with pack creation, NightLight Desktop has an image merging tool which lets you select a background and/or overlay image and then folders you wish to apply them to.
It will then automatically iterate though the icons merging them together. You can have it either overwrite the source icons or save the result to another folder. You can also use the default packs as the source to save having to install/copy them first.
Download NightLight Desktop here
Variants
NightLight allows for you to upload further icon packs and set them as variants of other packs. These can be used for various purposes; for example, a different colour, or different background. If you’re not sure if a pack would be best listed as a variant or its own listing, feel free to ask for opinions in the discord.
To set a pack as a variant, upload it as normal. And then, under the Published Packs tab, click the Settings of the variant pack. Here, you can set the primary pack the variant should be attached to. (You can do this before a pack is approved by a moderator.)

General Tips and Notes
- Icons packs will appear differently across different resolutions and with UI scales. It's recommended to test on a 16:9 resolution (specifically 1920 x 1080) with the UI scale set to 100% where possible.
- Make sure to test your icon pack by manually replacing the icon files before uploading to NightLight.
- Connect your discord account to your NightLight account in the account settings and join the NightLight Discord server to receive the icon pack creator role and chat with other icon pack creators.
- The default, base versions of the perk icons include a shadow. This can get in the way of many custom designs so NightLight provides a version with these shadows removed. If there are any issues with any individual icons in this pack, please report this to britishboop.
- If you have any suggestions for this tutorial, please let us know in the discord as well!